
If you’re an online business owner, you’re always looking for ways to boost sales. While an obvious place to start for a lot of brands is to hit the display network and run some Facebook ads, the best brands practice omnichannel marketing.
An essential component to your digital marketing strategy should include Google Ads. The unfortunate reality is that many companies have either not explored this avenue or have been burned by an agency in the past and have lost trust in its power.
Research shows that Google Ads account for as much as 18% of all eCommerce revenue. There’s no question that Google can generate more sales for your business. The question is where to begin? As a platform with a lot of different options to choose from, knowing what’s relevant to your success can be daunting.
In this guide, I’ll walk through the most relevant features for setting up ads that truly convert.
Setting Up a Google Ads Campaign
Google has four different types of campaigns you can run; search, display, shopping and video. For the purpose of driving sales, the 2 best options for eCommerce are going to be the search and shopping campaigns.
In order to properly show you how to set things up, we’re going to focus on building a search campaign. When setting these up, you’ll need to know which associated bidding strategy will bring you the most success. Despite the multitude of options, you’ll want to start out with Maximize Conversions.
You’ll want your campaigns to run on maximize conversions for a minimum of 6 months to a year for the best ad performance. Once you’ve given Google the time to learn and perform for this time period, you can then revitalize your bidding strategy by switching to Target CPA.
*Note: you’ll only want to do this when you and Google agree on the best CPA.
How To Build Your Search Campaign
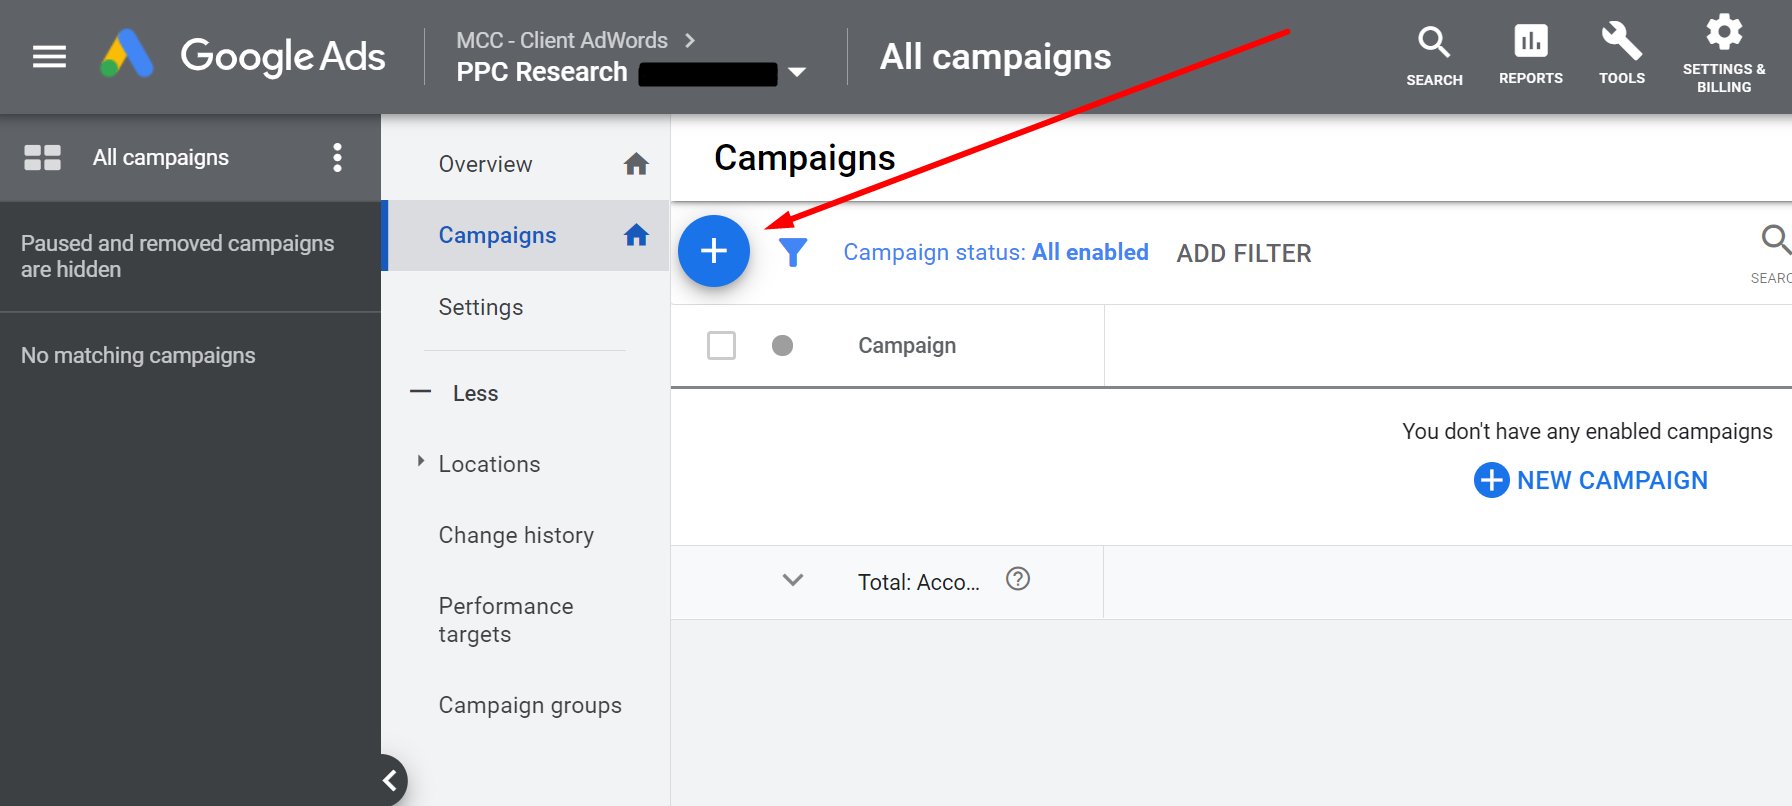
Now that you’re in the Google Ads account, you’ll want to click on the blue plus and then new campaign.
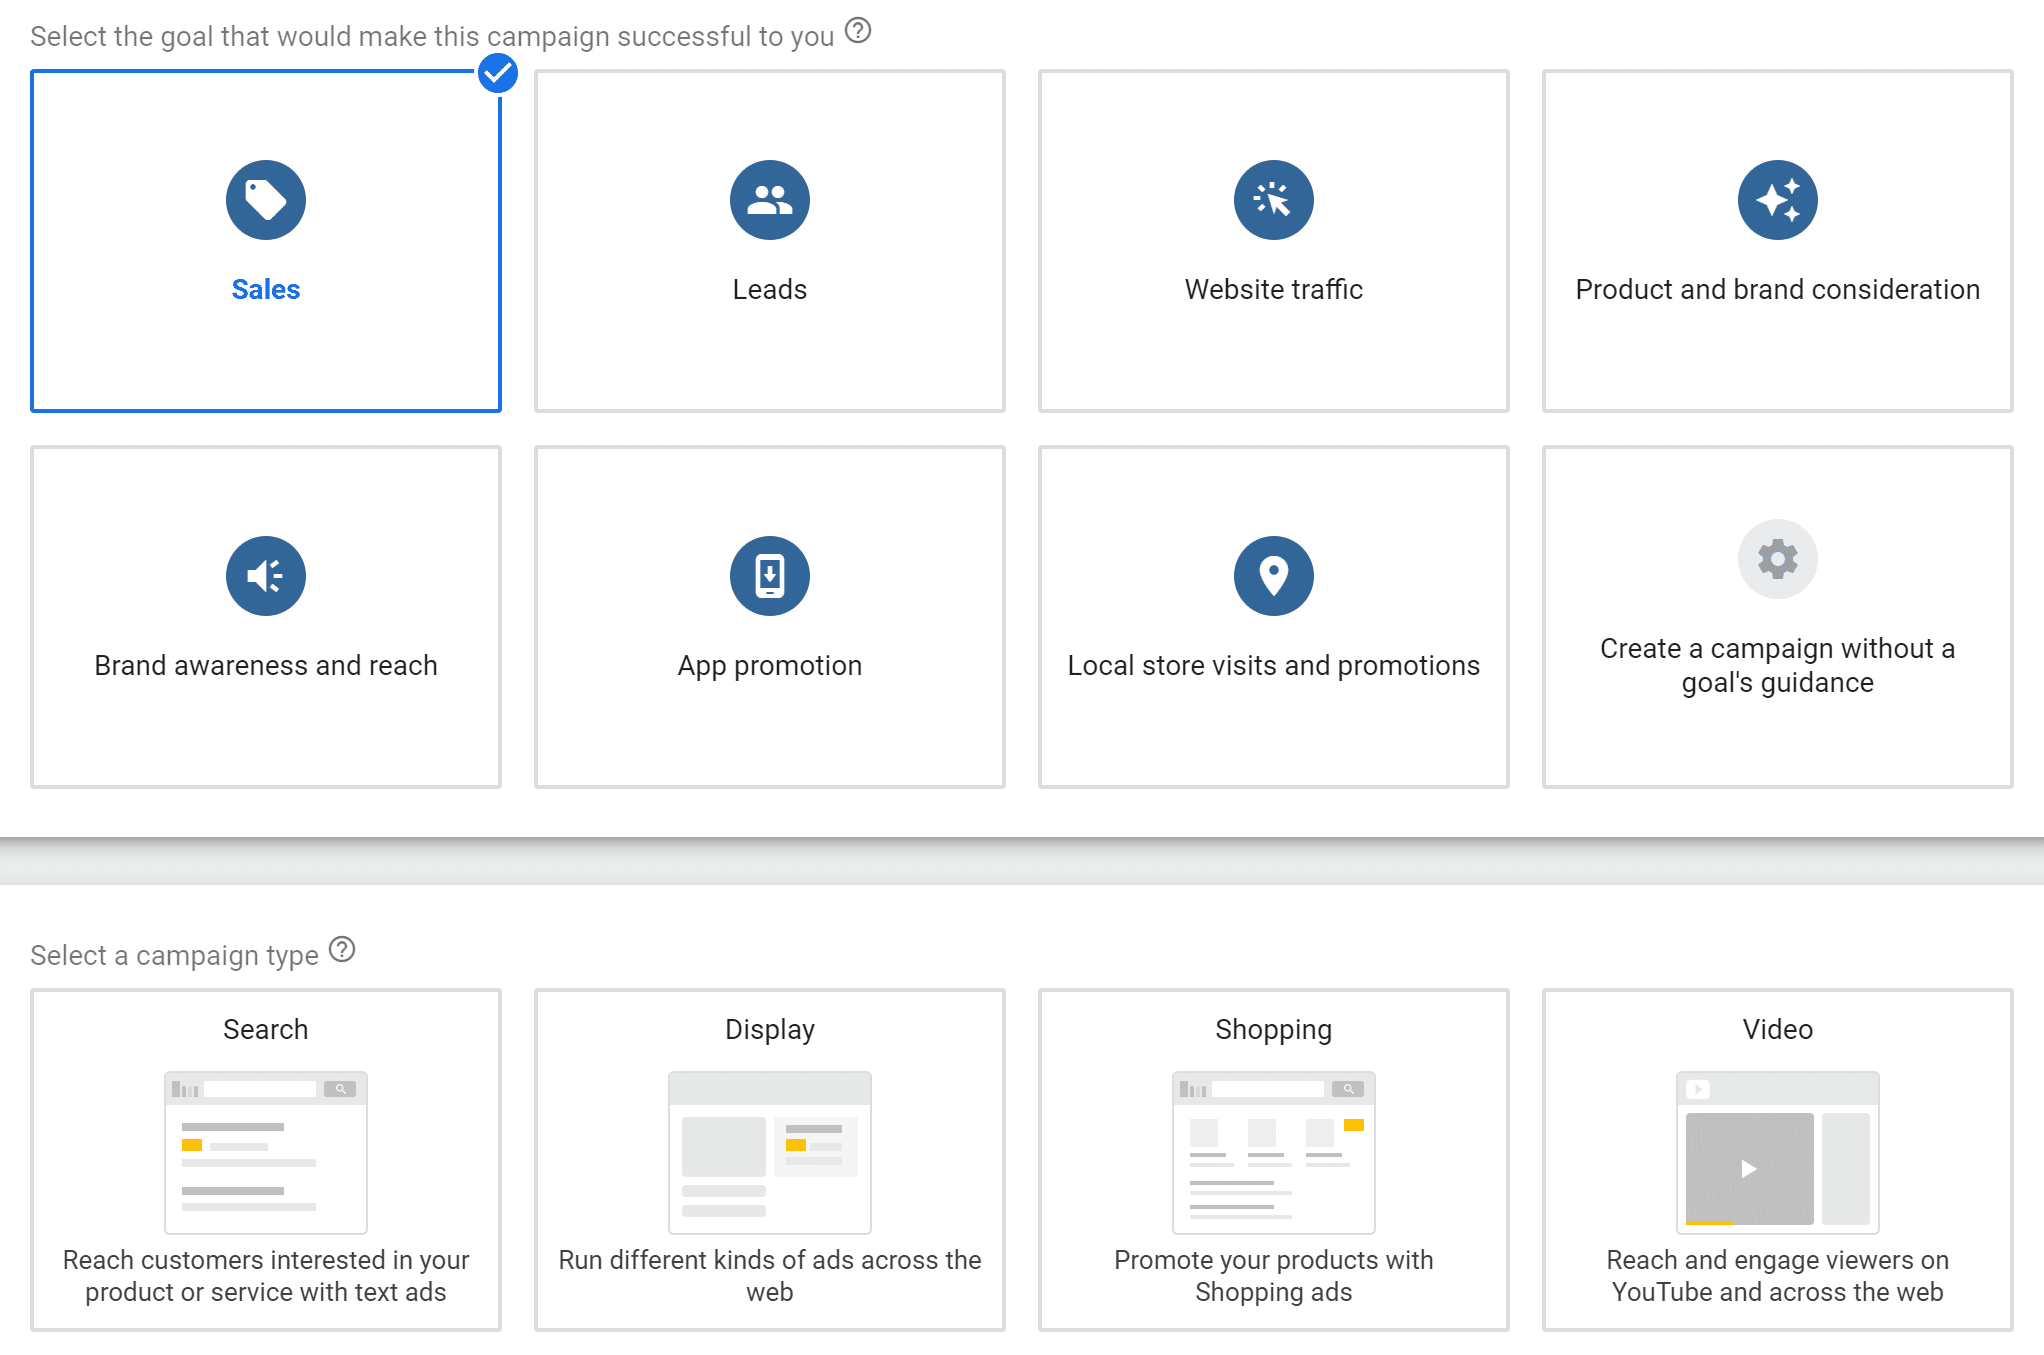
Google will then ask you what you want to do. For eCommerce, you’re going to want to select sales. Then select the Search campaign option.
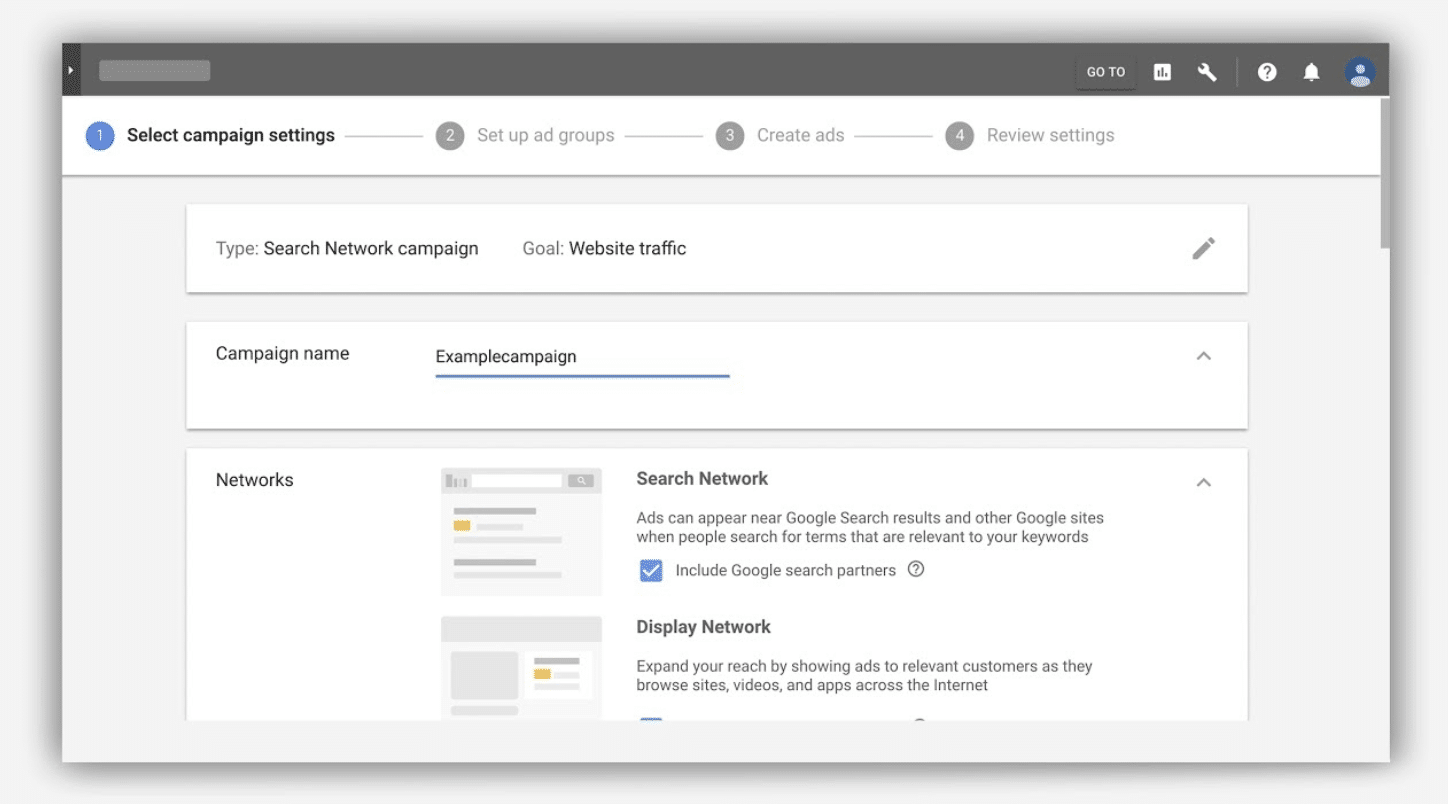
The next step is crucial. Google automatically has these 2 options selected. This will make your ads pop up on other websites like blogs, etc. You’ll want to Deselect both the Search and Display Network boxes as they can lead to bleed. Keep everything on the Google Search Network.
Extensions
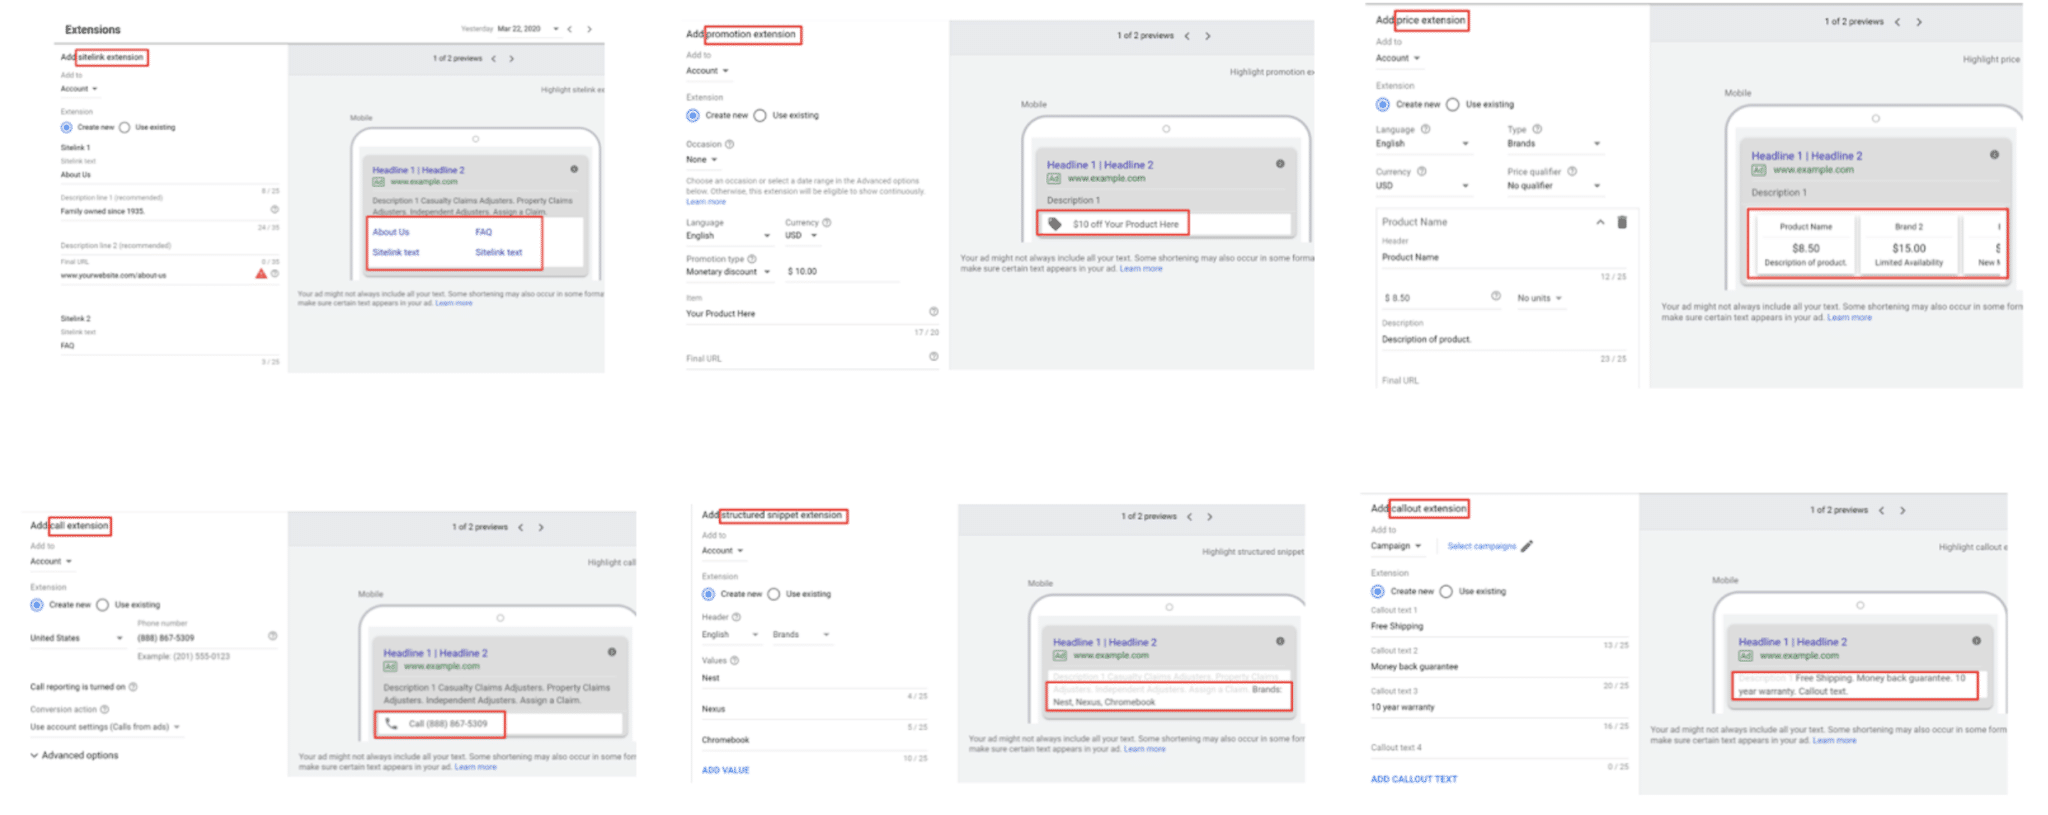
Now that you have your campaign built, you’ll want to ensure that you’re making use of extensions. It’s best practice to use as many extensions as you can (recommended at least 4). The bigger your ad looks, the more legit and safe your ad comes across to the searchers.
The extensions you use have to make sense for your business. That said, here are some extensions that are great for eCommerce brands.
Search Term Maintenance
This is a space you’ll want to live in on a daily basis to ensure that the ads you’ve built are performing to the best of their abilities. The more information that you give Google, the better your ads will perform for your target audience.
The Search Term Report will show us new search queries that have high potential so we can add them to a campaign. It also shows us irrelevant queries that trigger our ads so we can add those to our Negative Keywords.
For Example: If a company sells formal shoes and you see search query “running shoes” triggering your ad, you should add “running shoes” as your Negative Keyword
Building The Ads
The first major step of setting up your goals and building a campaign is over, and it’s time to set up the actual ads. Continuing under your search campaigns, once again you have a multitude of options for the types of ads you can build. For the goal of growing sales for your online brand, we’re going to look at the top 3 options for a successful campaign: Text Ads, Responsive Ads, and Dynamic Ads.
Text Ads
All the ads are going to look the same for searchers, the difference between all these ad types is control. Text Ads give you the most amount of control for creating the ad of your choice. Let’s take a look below.
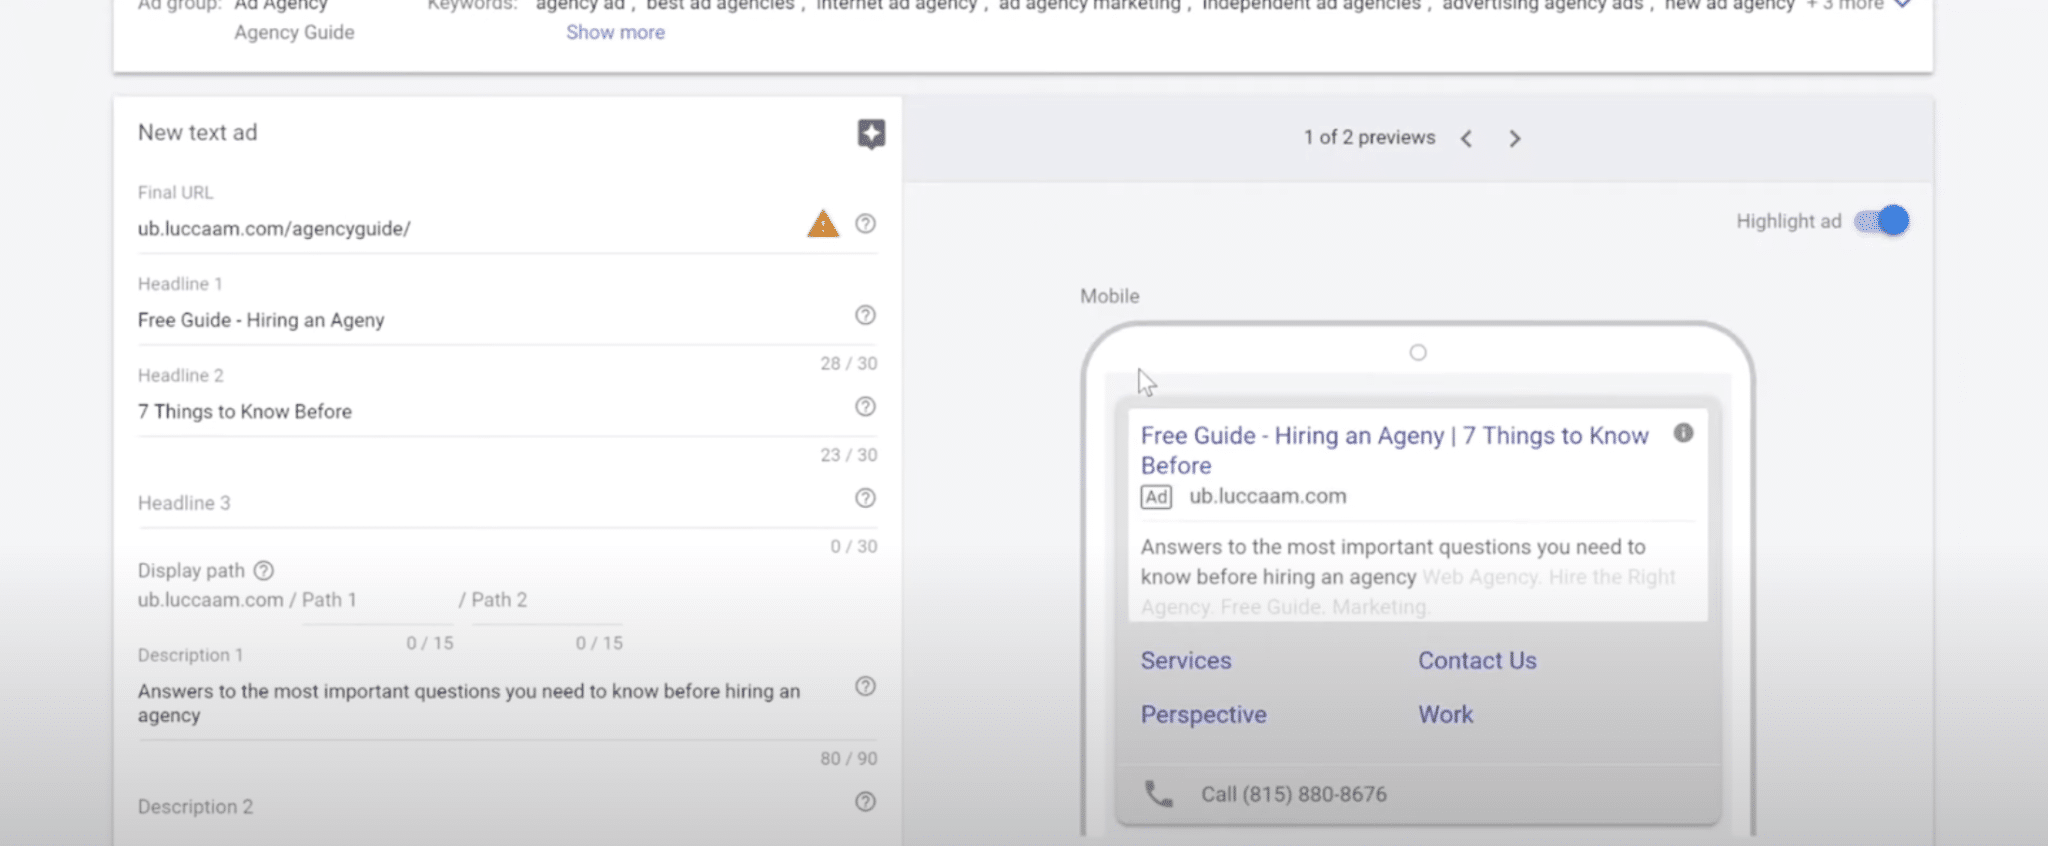
On the right, you can see what the ad will look like on Google. The left hand side is where you build the ad. There’s two areas that focus on where you send the searches. The final URL will be the link to the page you wish to send consumers. The display path will be the URL that is seen on the ad itself.
As you can see, you also have the ability to create your own headlines and descriptions. Don’t just put anything here. Recall conversations you’ve had with clients and questions that they frequently ask. Use that verbiage when creating your ads.
*Important Note: Once your first ad is created, copy that ad and create a 2nd. It’s as easy as switching around the headlines and descriptions to differentiate them. Your ads will automatically perform better as the algorithm needs at least 2 ads for best results.
Responsive Ads
Next we have responsive ads. With text ads, you control exactly what the searchers see on your ad. With responsive ads, Google will make the decision on what will populate on the ads. Below you can see how the set up differs.
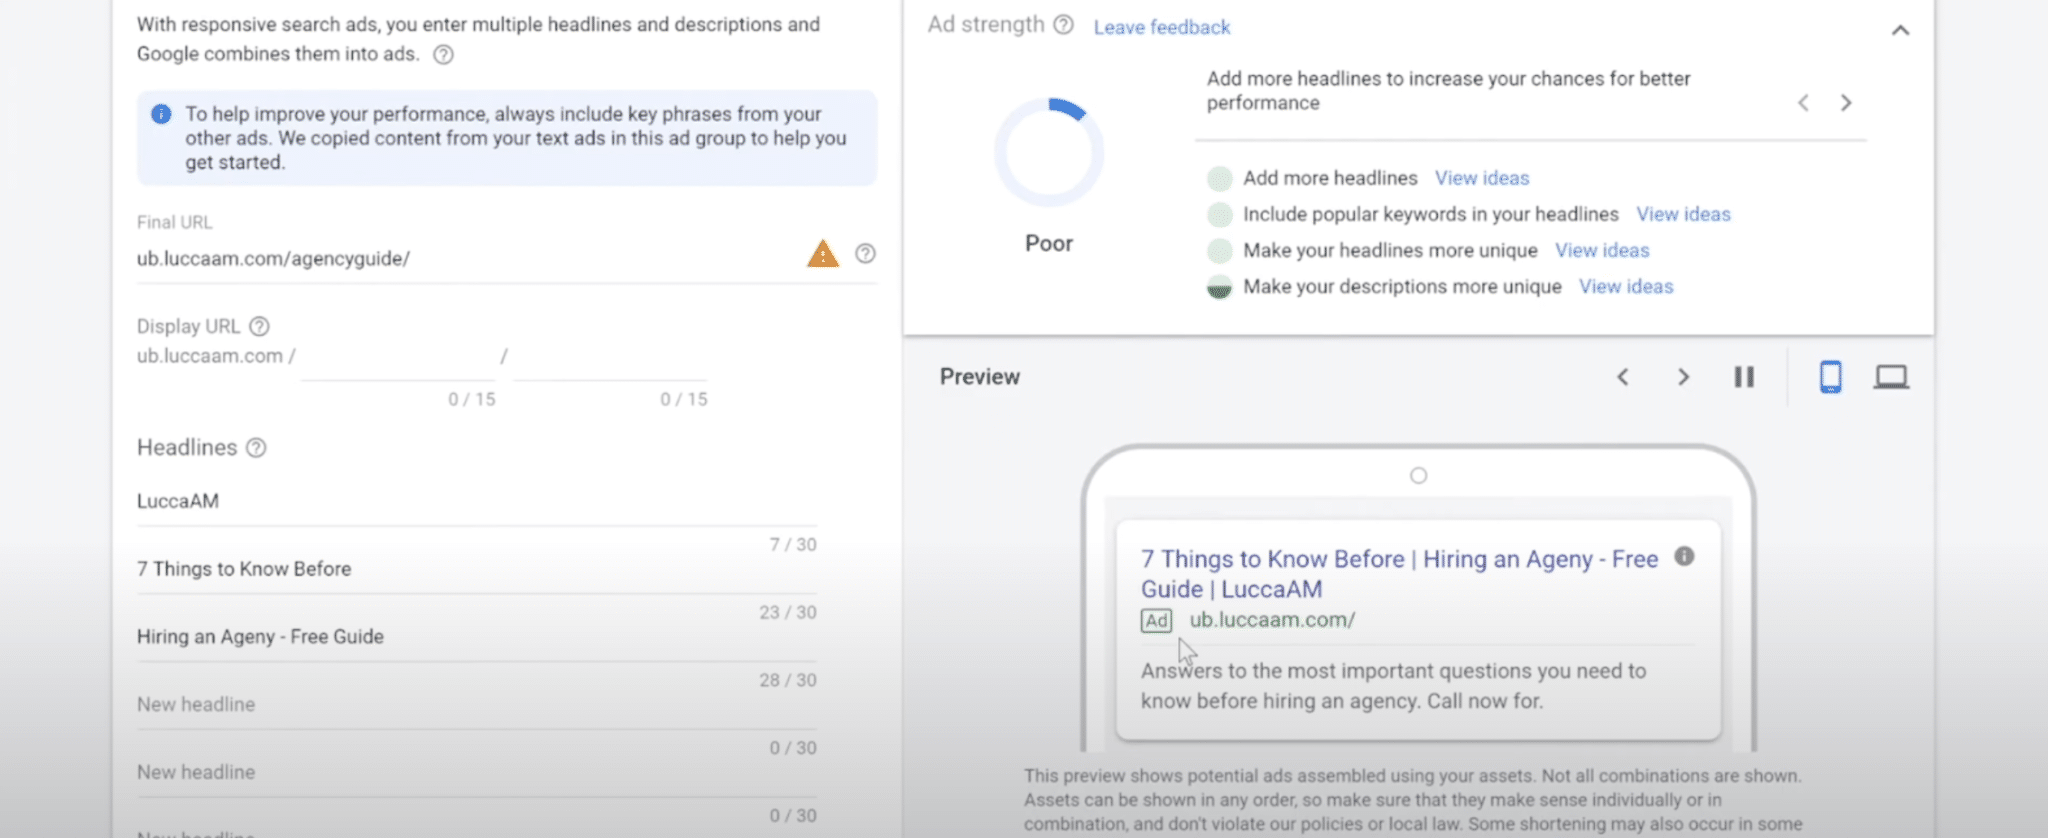
The set up section on the left gives you a longer list of headlines and descriptions to input. You’ll input as many of the options as possible and Google will populate what it thinks your searchers are looking for.
Another difference you can see above is the ad strength widget. It lets you know what you need to add to your sections for maximum performance. Once you’ve made the proper adjustments, the circle will give you a check and you’re ready to live.
Dynamic Ads
When it comes to dynamic ads, Google has even more decision making powers. The only option you’re given in setting up these ads is to provide descriptions. Google scrapes your website to determine where to send searches, what headlines to use and the best display URL.
While you can see what’s converting in text and responsive, it is important to note that maintenance for your dynamic ads will look different. If a dynamic ad isn’t performing well, you don’t want to make a hasty decision and just turn it off (the case is true for all ads – test each for a minimum of 30 days). You’ll want to look at where Google is sending searchers and remove the URLs that are bleeding your budget.
Conversion Optimization
If you’ve followed the steps this far, your ads are finally up and running. Now you need to know how well these strategies are working out for you. It’s an essential step to frequently look at the data on your performance to make decisions that will increase your conversions.
This is the step that is often missed by not only business owners, but agencies that have burned clients in the past. You can’t just sit and let the ads run and forget the rest. Below we will walk you through how to set up conversions and what to do with all the data.
How to Set Up Conversions
In your Google Ads platform, go to tools and it will give you the screen below.
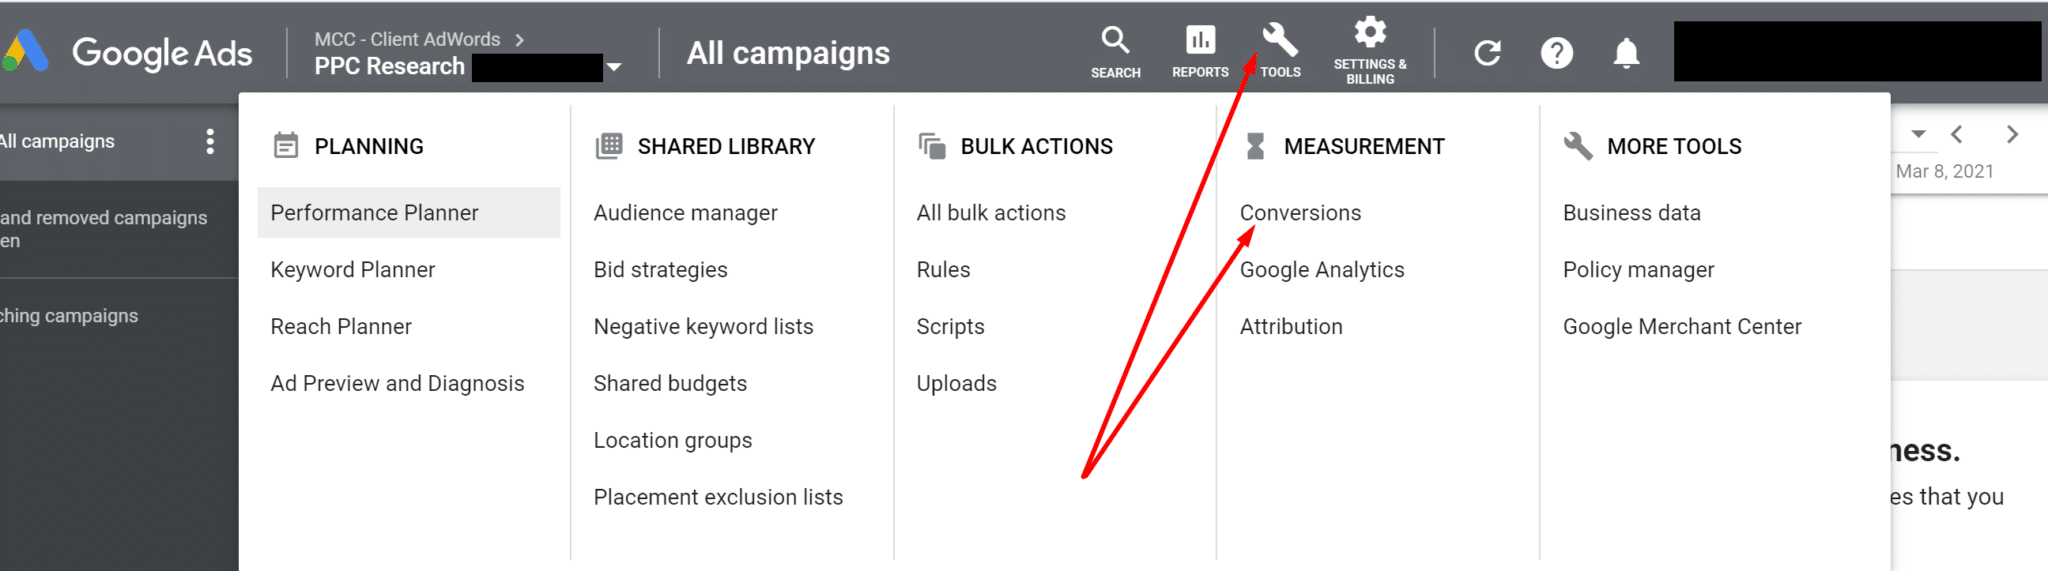
Conversions is the top option under the measurement section. Once you click here, it will take you to the conversions dashboard to go ahead and set things up. Just like building your campaigns, you’ll choose the blue check to begin.
![]()
The most commonly tracked website conversions are online sales and signups. It makes sense if you’re an eCommerce product brand, you’ll be tracking online sales. If you’re more of a service business, signups for demos or proposals are your conversions.
Next up is setting your conversion actions. To track sales, set your category to purchase and then name the conversion. If you’re running different ads for different products, make sure the name reflects the difference. Otherwise, you can put your brand name as the title.

Assuming your brand offers a variety of products at varying prices to your audience, you’ll then want to select the above option under value. Not only does this tell you how much you’ve spent and your conversions, it tells you how much revenue your ads are bringing you.
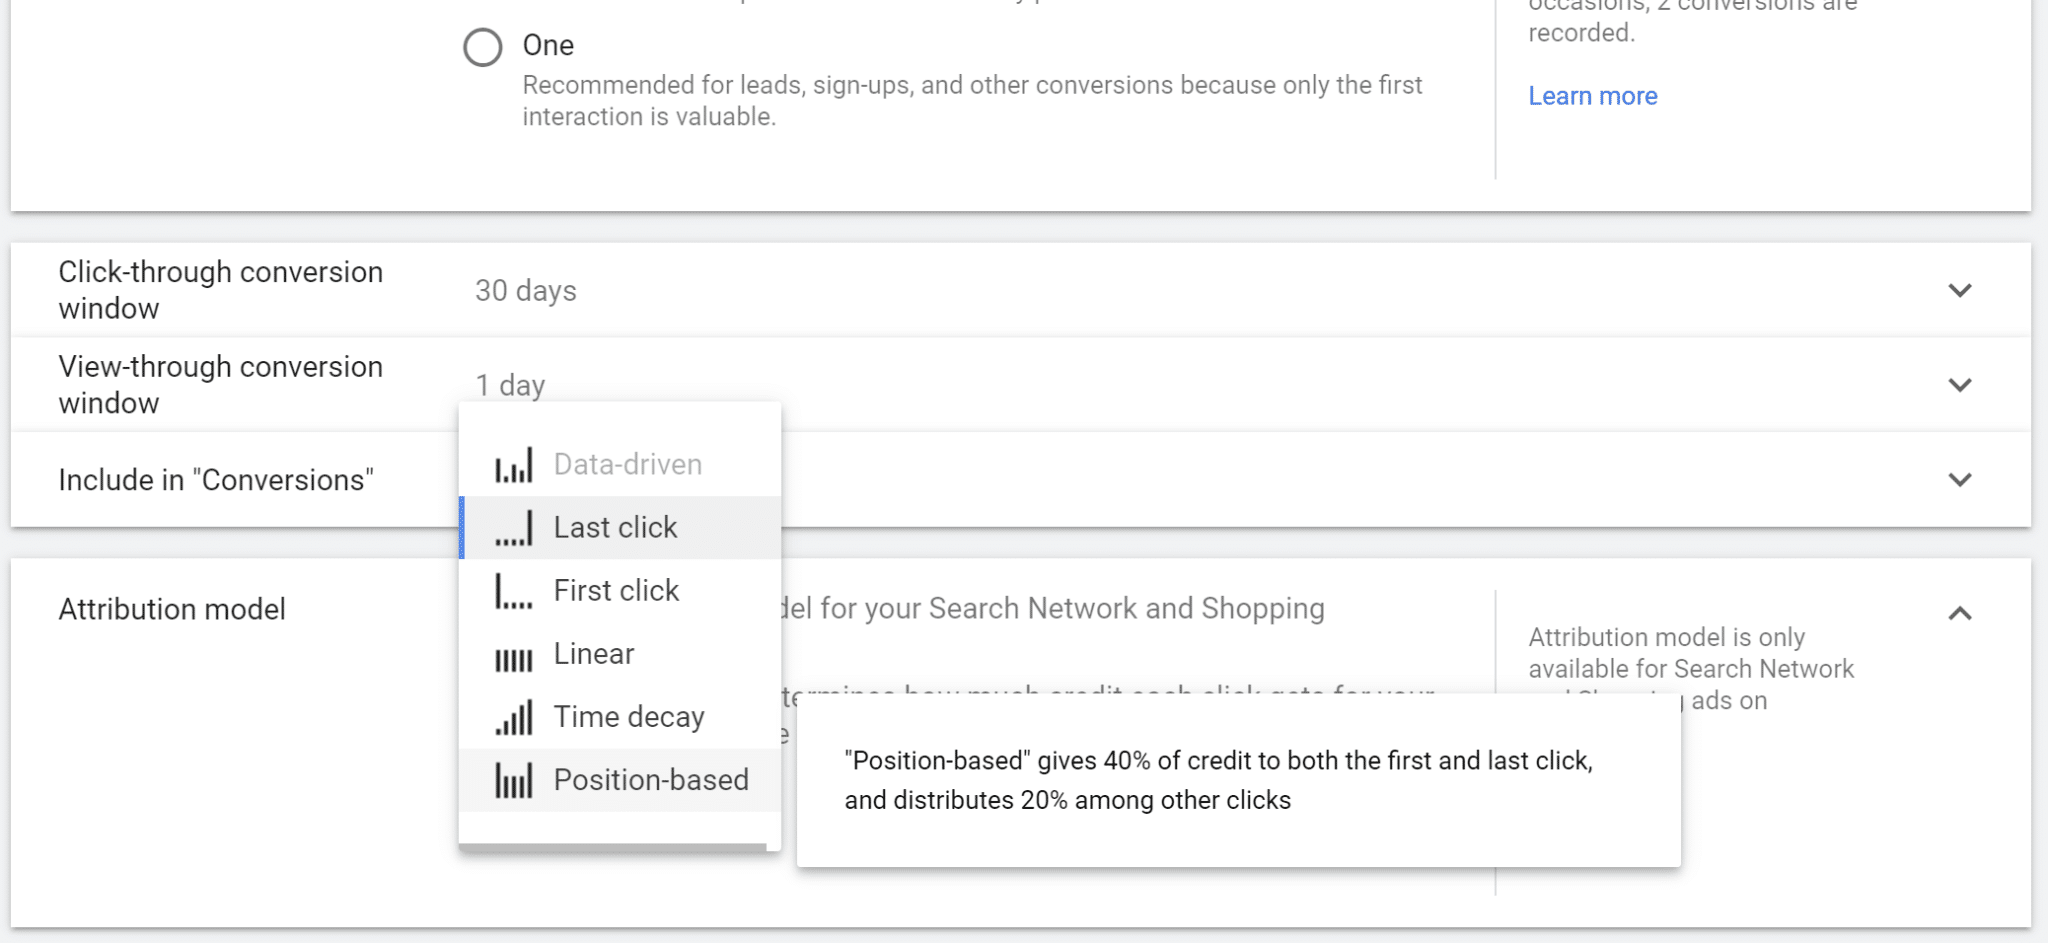
The last option before completing the conversion tracking setup is one that’s often skipped. This is where you choose how your data determines a conversion. For the most accurate understanding of your ads performance, set your attribution model to position-based.
Position-based breaks down conversion credit to the first click and last click (40%) and other clicks along the way (20%). The reason this is so important for your data to read this way is it goes beyond just showing you which ads perform better. It gives you real information on your audience’s buyer behavior. Use this data in determining new ways to market to your audience in ways they are most likely to entice a reaction.
What to Do with All The Data
Conversion tracking is all set up and now you’re left with all the data you could ask for. Google gives you complete customization options to set up the dashboard with tons of information about your business. There’s a lot to choose from, so we’ll tell you which ones are vital to have when creating your dashboard.
To take a deep dive into understanding how your ads are performing, you’ll want to be in the campaign view. Here you can add whatever columns of data and in what order you need. Below you can see some different options as well as the 4 must have columns to look at: cost, conversions, conv value, and cost/conversion.
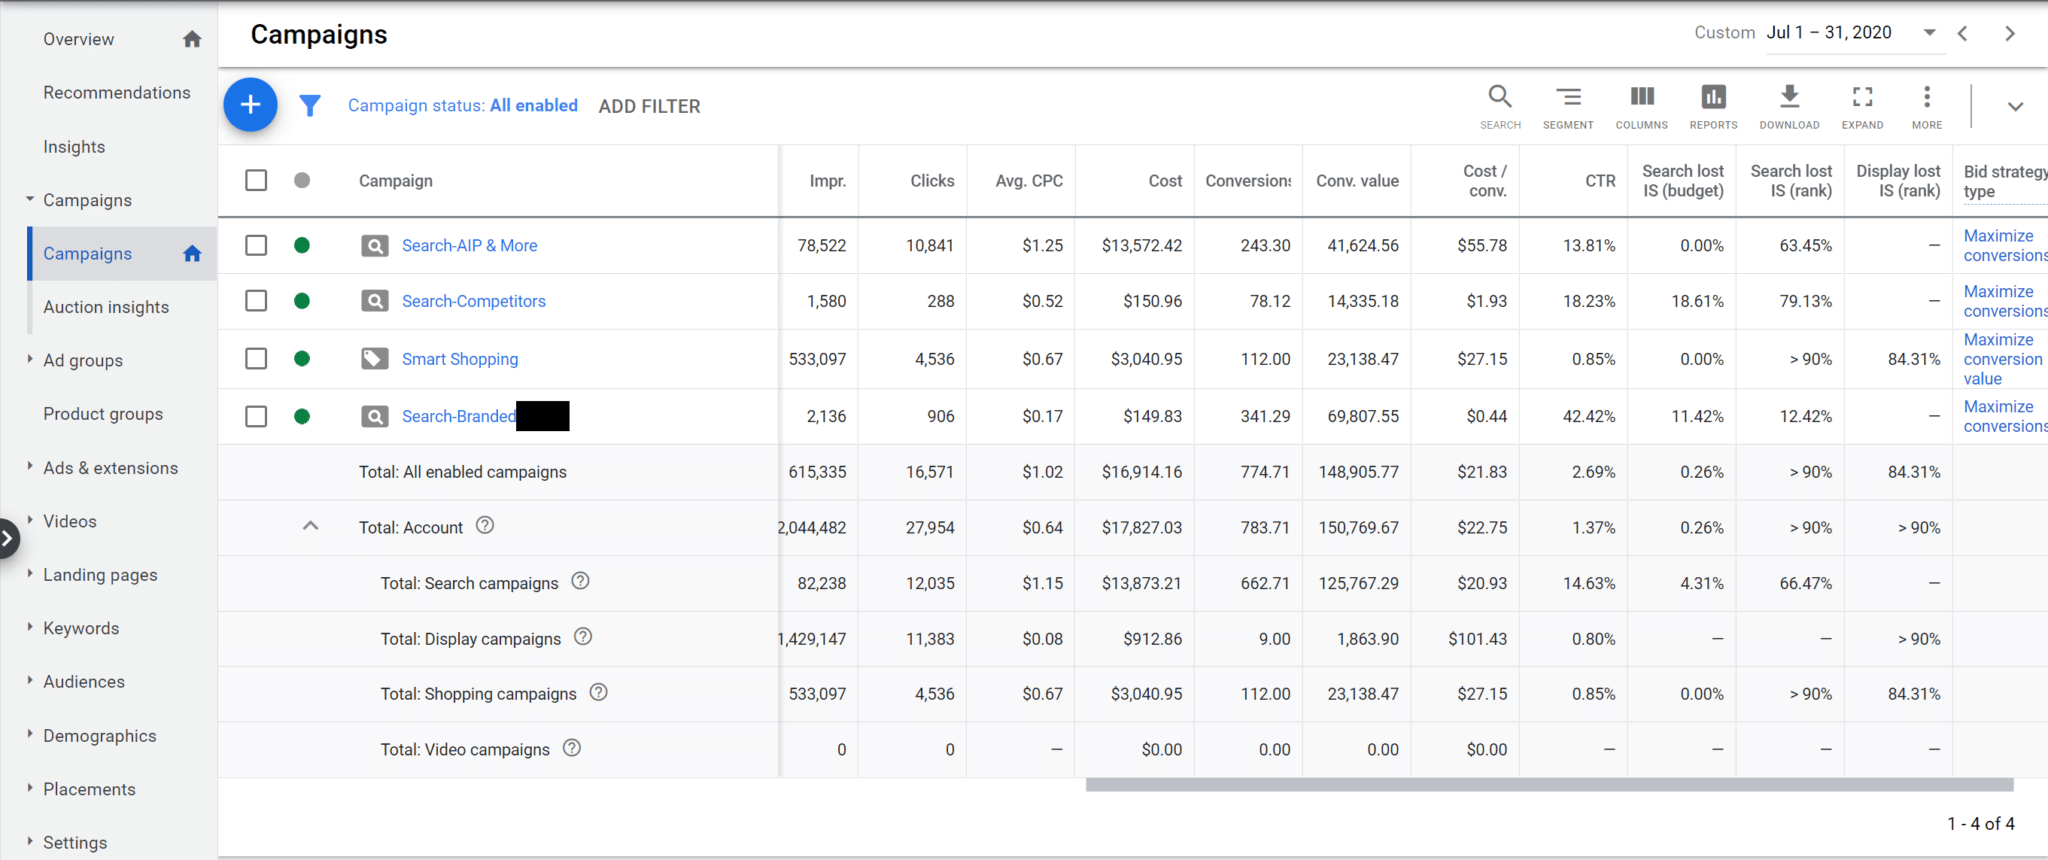
- Cost: tells you how much you’re spending on your ads
- Conversions: tells you the number of items purchased throughout your campaigns
- Conv. Value: tells you how much you’ve made from each campaign
- Cost/Conv: this is how much it costs for every conversion
*Important: set a goal for your ideal cost/conversion. Be sure to know what your costs
are (unit price, shipping, ad spend, agency fees) to set your baseline and ensure profit
As I’ve mentioned earlier, you never want to jump into turning things off right away because you don’t see results overnight. You only want to spend money on things that convert, but in order to give your ads the best chance at success you need 90 days of data. This data can help you make a multitude of strong adjustments before resorting to ending an entire campaign.
Let us further explore how to make adjustments to the dynamic search ads we’ve built.
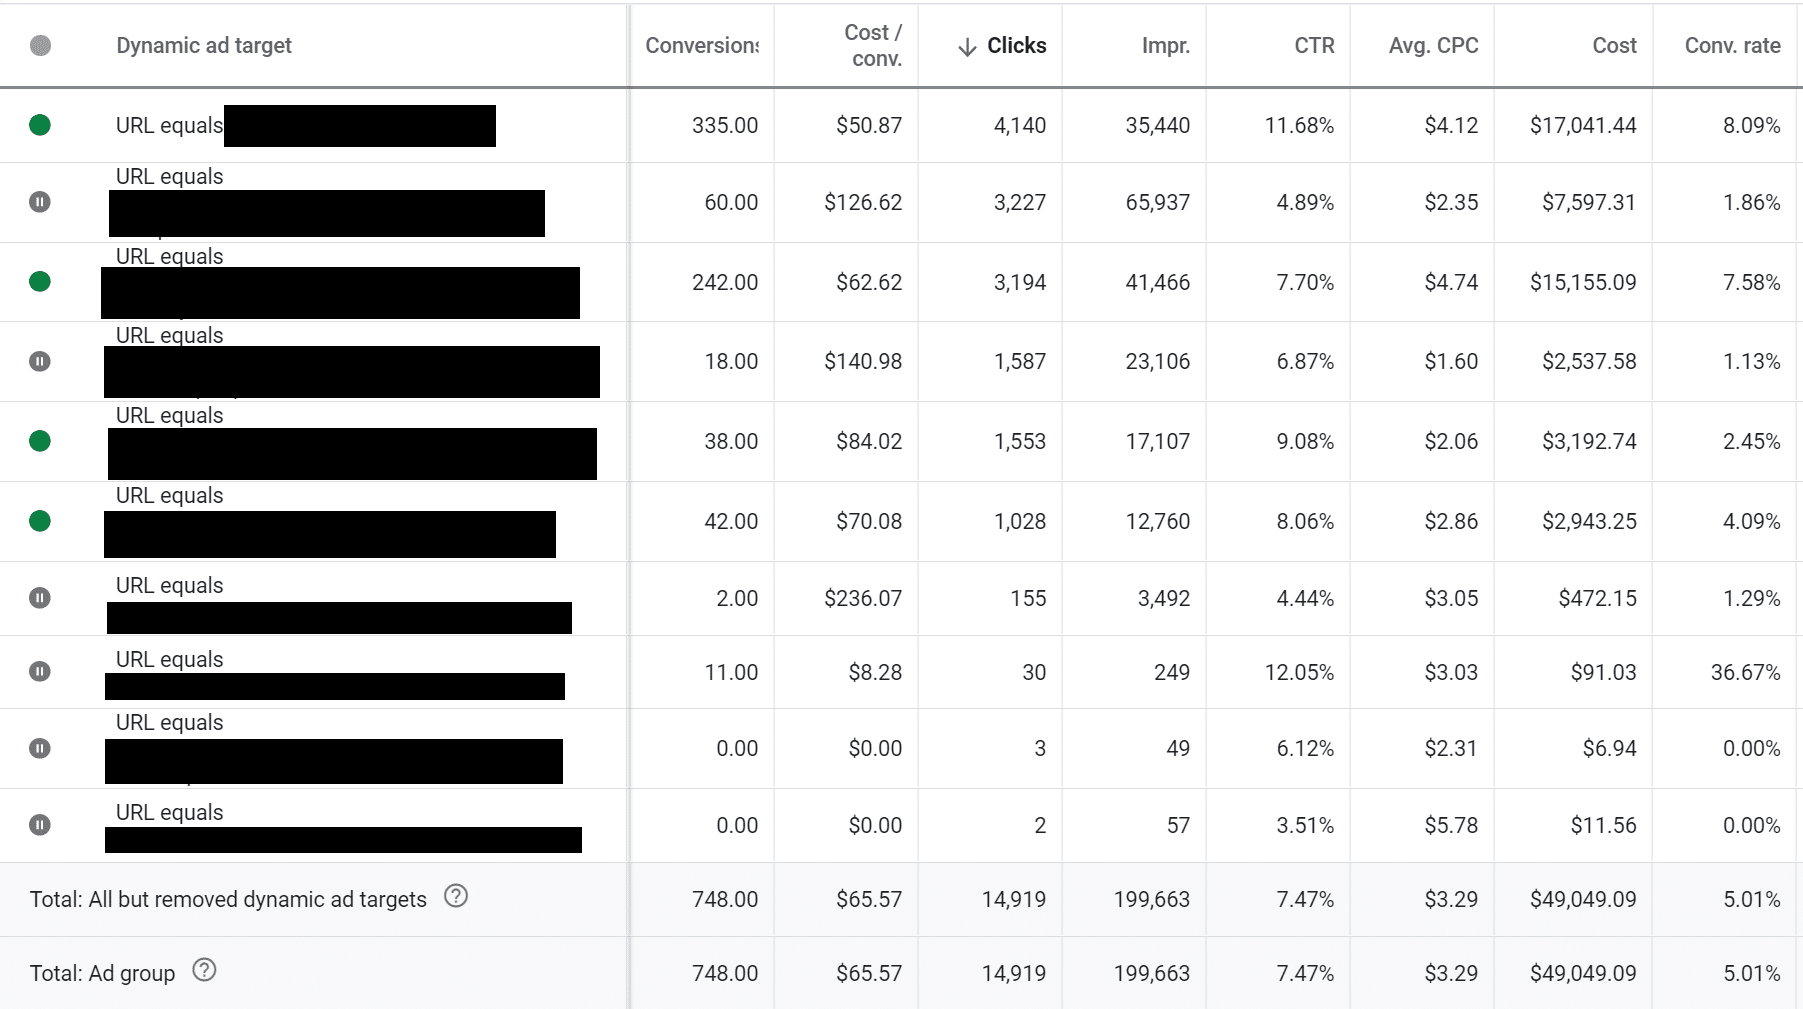
Here you can see an example of a dynamic ad we were running for one of our clients. The ad was converting but the ROI wasn’t at the level we wanted. So we looked into the pages that Google was sending the searches.
The bottom examples of paused pages are pretty straight forward. Not many conversions came from those pages so we paused the URLs. The paused examples at the top are a little different. While both of these pages were converting, their cost per conversion was extremely high.
Pausing all these pages led this campaign to convert at a higher rate with a lower cost per conversion. This is just one example of several things you can do with the data on your conversions. The main takeaway is to let your ads develop the amount of data necessary for decision making, and try everything you can before ending a campaign.
Now that you have the fundamentals, you can run campaigns like the professionals. If you’d like any help from our team of experts along your journey, please don’t hesitate to reach out!